Abstract2actual
  • Home
  • Blog
  • Gallery
  • Buy stuff
  • Contact
  • About

Some updates to the 1U CubeSat model

1/22/2018

0 Comments


The A2A 1U CubeSat is representative of the pinnacle of crowdsourced agile engineering.

​The Main Board is loosely based on the now defunct open source fractal encabulator.  Otherwise, the board is comprised of commercially available off the shelf components including the nofer trunions.  Even the most elementary students of encabulation will notice the conspicuous lack of hydrocoptic marzel vanes which, aside from exceeding LFM mass limitations, would be completely useless in the vacuum of space. The sole function of the Main Board is to handle any event of sinusoidal deplaneration.  When this occurs, the lunar wayne shaft is engaged to facilitate a forescent score maneuver to prevent bit fumbing.
Picture
Picture
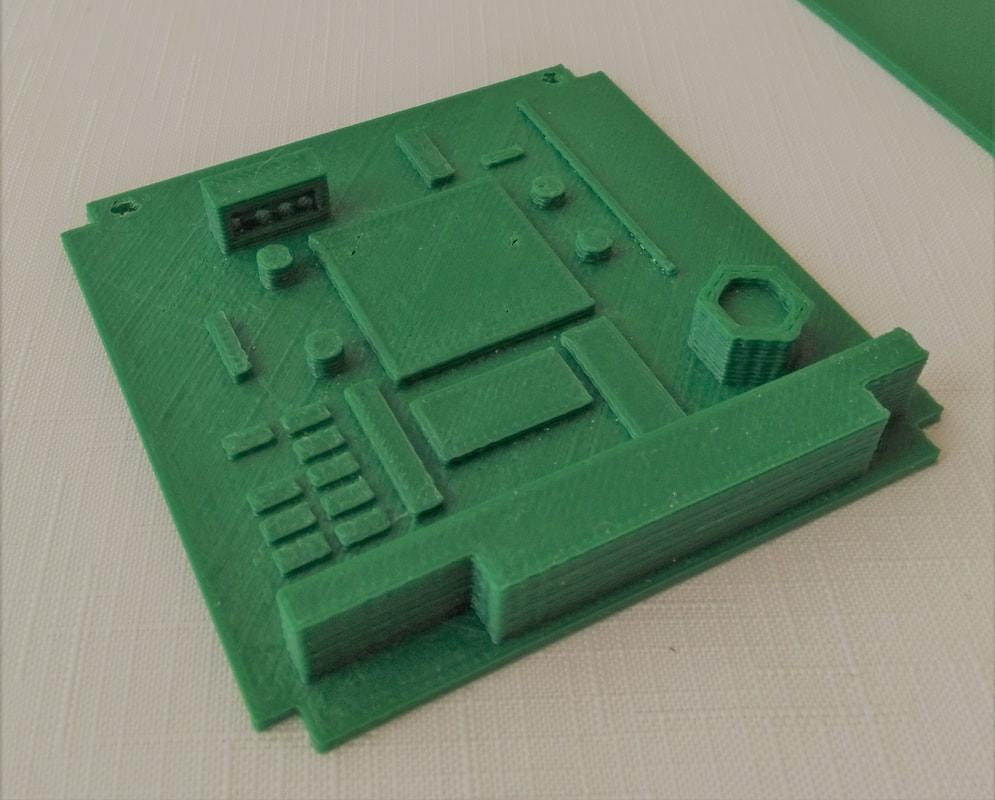
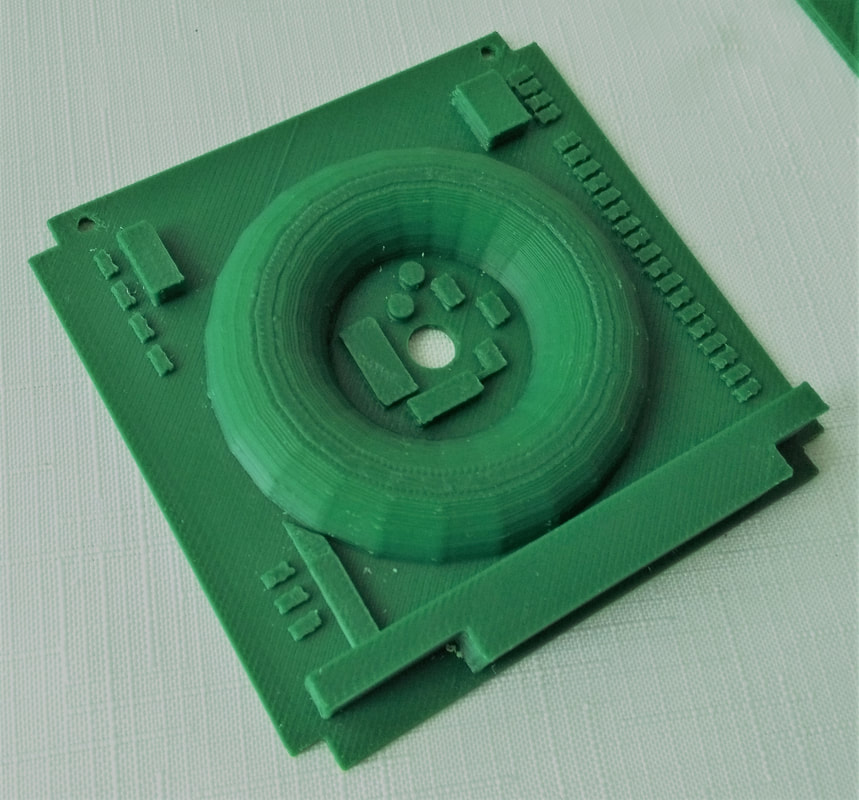
​The micro CERN isometric particle accelerator with tuned ejection port provides primary propulsion at scale.  It is capable of producing 6 braleys per terrex in the lateral and longitudinal planes whereas rotationally, the output is a logarithmic tangent of the inverse.  A series of concentric ductile plenums conjoined with gribbley collets in an atypical trapezius configuration ensure translational and rotational alignment of particles immediately preceding ejection port engagement.  Particle malignancy beyond the distal facia is negligible


​​Professional engineers and amateur enthusiasts alike will appreciate the inclusion of a fully customizable circuit card with the standard prefamulated ammulite substrate.  With its PC104 form factor, creation of monolithic circuits tailored to mission objectives has never been easier. 
Picture
Picture


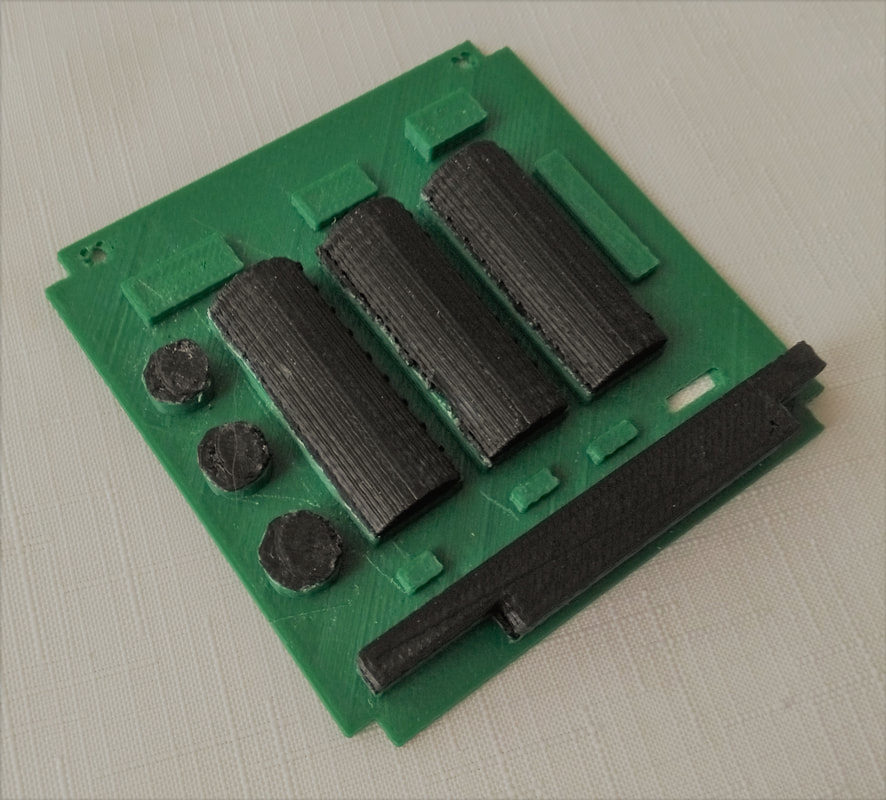
​​System power is provided by an advanced quark capture amagulator master power unit (MPU).  Bosons passing through the triplet of IEC R6 cells regenerate the cathode through ionization, providing an extended MPU lifespan. Converse redundancy in this configuration, eliminates the requirement for onboard ancillary power units (APUs).  


​
​I do want to take a moment to thank my good friend Rick Lavin at the Dragon Moonshine Company in Charlotte , NC for first introducing me to the genius of the Encabulator.  


To learn more about the fascinating technology behind the Rockwell International turbo encabulator, check out the youtube video in the link to the left.
0 Comments

Printing the city of Charlotte

1/7/2018

0 Comments

 
, After printing the Dallas model, Sonya wanted to know if I could print our own home city, Charlotte, NC.  I looked online for models and there are none, so I am going to design and print it from scratch.

​Starting with a satellite view of the city from Google maps I'm using SketchUp to model the buildings .  I made a screenshot of the city and imported the .jpg into SketchUp.  From there I can outline the base of the buildings and pull the model up out of the outline.  I am referencing skyscraperpage.com for building heights, then using Google maps and Bing maps satellite and street views to get details for the buildings.

I spent about 8 hours on the first building, the Westin hotel and then about 6 hours on the new Regions Bank building next to it.  Later I spent about 7 hours on the Duke Energy Center building, where I work.  Next to it is the Mint Museum, and Museum Tower apartment buildings which took me another 6 hours.  I then decided to tackle One Wells Fargo Center which took me about 14 hours.  What made it so difficult was that it is about 1 degree off of the X-Y axis in Sketchup and I didn't realize that one of the walls was automatically snapped to the green axis.  When I got to the top of the building, it wasn't symmetrical, so I basically had to tear it all down, find the stray line and rebuild it all.

Although it isn't a skyscraper, the Bank Of America stadium is a significant landmark in the city that I want to include in my model.  For this, I got a very zoomed in satellite image to base it on.  When I tried outlining the building in SketchUp, I found that my lines were not staying on top of the picture, which meant I couldn't see where one line ended to connect the next line.  Not knowing what to do, I "exploded" the .jpg image of the stadium and then my lines layed on top of it just fine.  I was in for a real surprise when I pulled the building up from the base because the image remained on the extrusion.  I was not expecting this at all.  I thought the extrusion would simply be the basic white material in SketchUp.  Then when I started manipulating the surfaces , I found that the image stuck to those too.  The result of 7 hours of design work was this really cool looking model below, which took about an hour to print
Picture
Picture
I published the BOA stadium model on Thingiverse HERE if you want to print one yourself
0 Comments

Printed the city of Dallas

1/1/2018

0 Comments

 
My son TJ II saw a 3D printed miniature of the city of Dallas and wondered if I could print it for him.  He had a link to the creators website ​​http://www.3dprintedskylines.com/  The creator was also kind enough to publish the design file n Thingiverse HERE.  Of course I wanted to print a really big model, around 18 inches from end to end. Scaling up the original model from Thingiverse was easy, but it was not easily chopped into seperate printable sized pieces, so I spent about 40 hours cleaning up the file.  I then seperated it into seven printable sized chunks and sent them to my X3REX modified Prusa i3 printer.  I also published my remixed design files on Thingiverse HERE.  After 48 hours and 38 minutes of printing and about 800 grams of ABS filament I have this really cool looking model
Picture
Dallas (only bigger) scale model: #Abstract2Actual 3 days 16 hours 38 minutes
0 Comments
    View my profile on LinkedIn

    TJ Emsley

    Lifetime tinkerer.

    Archives

    October 2022
    January 2021
    November 2020
    October 2020
    September 2020
    February 2018
    January 2018
    January 2017
    October 2016
    August 2016
    July 2016
    June 2016
    May 2015
    April 2015
    March 2015
    February 2015
    December 2014
    October 2014
    August 2014
    July 2014
    May 2014
    April 2014
    March 2014
    November 2013
    October 2013

    Categories

    All
    3d Design
    3d Printing
    Open Source

    RSS Feed


Proudly powered by Weebly