Abstract2actual
  • Home
  • Blog
  • Gallery
  • Buy stuff
  • Contact
  • About

Created some brackets

6/22/2016

0 Comments

 
I recently needed to make the bathroom a little neater.  Some things in the shower were just in the way, namely Sonya's razor and her Olay ProX face scrubber.  3D printer to the rescue
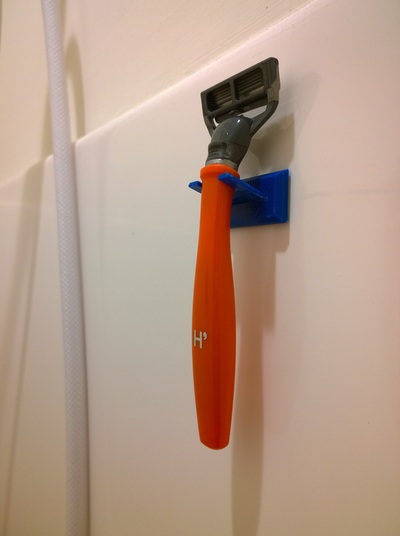
The main issue with the razor really wasn't that it was in the way as much as that while it was lying flat, it stayed wet and the blades eventually got rust on them.  A hanger could definitely resolve that problem.  I designed a two part bracket in 
and mounted it to the wall using a waterproof 3M Command strip.
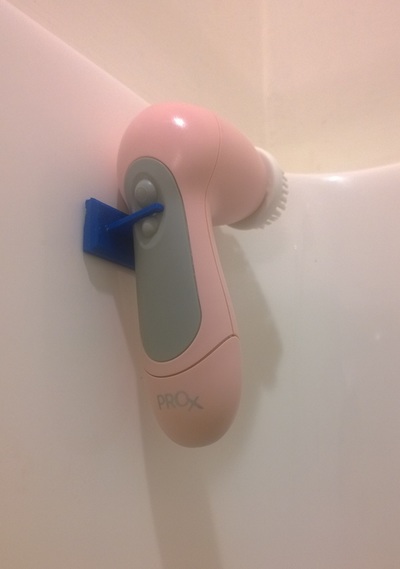
The success of this bracket compelled me to modify it slightly and create another mount for her Olay ProX exfoliatior.
The angle of the razor bracket is 15 degrees in the Z axis, but I probably could have gotten away with 12.  The ProX exfoliator has a 10 degree angle in the X axis and a 5 degree angle in the Z axis.  Printing in two pieces provided the necessary structural integrity, and allowed me to print without supports.
By the way,if you haven't tried razors from Harry's, you don't know what you're missing.  Good shave, great price, delivered right to your door.
0 Comments

gaming character and objects brought to life

6/22/2016

0 Comments

 
Picture
Pup, a character from a yet to be named Pixel Interaction Studios AR game
Picture
Pup at 100% and 200% scale
My friend Andre, at Pixel Interaction Studios http://pixelinteraction.com/ is working on some pretty cool Augmented Reality (AR) kids games.  For this he wanted to have a few of the pieces of the game as physical objects that, when in view of the gamers camera, become an interactive part of the game.  He exported the 3d models as .stl files and sent them to me to see if I could print them. 

The character, Pup, was in really good shape, and I didn't have to do anything special to print him.  I sliced the file in Slic3r with .1mm layers, a 5 mm brim, generated support, and a relatively slow 35mm/sec print speed.  I noticed that the model was really tiny, only 15mm (about 1/2 inch) tall, so I scaled him up to 200% and printed one of each size in a single 45 minute print job on my Airwolf3d v5.5 in gray ABS.  There's a little clean up to be done, but the little guy came out better than I expected
Picture
Windmill house from the video game
The windmill and house were actually quite a bit more complicated because,
  1. The design files were not optimized for printing.  they consisted of several overlapping solid objects
  2. There are a lot of overhangs that won't print unless I generate support, which usually leaves messy parts and/or a lot of finishing work.
  3. The blades on the windmill are really very narrow, <5mm which requires very slow print speeds
This works fine inside the game, but they don't render well in the physical world.

y didn't slice very well be   brown ABS  fff
SketchUp to the rescue.  I don't have any sophisticated 3d modeling software, nor the skill to use them effectively, so I do what with SketchUp.  I imported the STL file for the windmill house and this is where I first noticed the potential printing problems
0 Comments
    View my profile on LinkedIn

    TJ Emsley

    Lifetime tinkerer.

    Archives

    October 2022
    January 2021
    November 2020
    October 2020
    September 2020
    February 2018
    January 2018
    January 2017
    October 2016
    August 2016
    July 2016
    June 2016
    May 2015
    April 2015
    March 2015
    February 2015
    December 2014
    October 2014
    August 2014
    July 2014
    May 2014
    April 2014
    March 2014
    November 2013
    October 2013

    Categories

    All
    3d Design
    3d Printing
    Open Source

    RSS Feed


Proudly powered by Weebly