 Airwolf3d Gearset
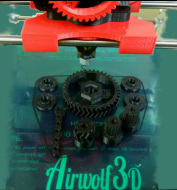
 I was thrilled that I got my little test blocks to print. So I decided to try and print something a little bigger. It was just a 3 inch square block about a half inch thick with some beveled edges and screw holes. I tried to print it many times, but it would get about half way through the build and the extruder would jam up. I tried and tried and tried, but to no avail. I figured there might be something wrong with my file, so I decided to go with a "known good" source file. I broke down and printed the gear set that Airwolf3d suggested I print in the first place.
Great news, the gear set printed, without a hitch! Bad news, I must be doing something wrong with my own design files. Back to the books I went and I learned lots of things. Different plastics melt at different temperatures. You can define this when you "slice" the file before printing it. There are about a hundred other parameters you can define when you slice the file.
So what is slicing? That is the process of translating a three dimensional CAD file (usually in .stl format) into commands that the printer controller can understand. The file that the printer controller reads is called a gcode.
Airwolf3d recommended I use an open source slicer program called Slic3r. Looking at all of the things you can control there was a bit overwhelming, but I eventually learned where to fine and set the basic parameters such as temperature, speed, and slice thickness. Airwolf3d also provided me with some prebuilt slicer configuration files that worked with my 5.5 printer. These configurations were the basis of my work, and I just tweaked them here and there as I learned how to use the features.
 #Abstract2Actual 2 weeks
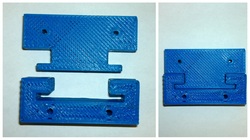
 It was two weeks of trial and error, mostly error, before I successfully printed anything. This first functional part was a mirror hanger. This is a 1.5" X 1.5" X 0.0625" square with a rounded top to act as a hinge. It was a very simple part, but the hard earned knowledge I acquired building it will take me a very long way.

 RSS Feed