 #Abstract2Actual in 0:45
 So I have this idea that I'm trying to patent and bring to market. It is a universal adapter that allows me to attach just about any smart phone to a rifle scope and record, through the scope, what I'm hunting. I've built several working models in my garage out of scraps of PVC pipe, MDF, craft mirrors, sheet metal, paperclips, screws and Elmer's glue. Resulting videos can be seen at www.crosshaircam.com
As functional as these prototypes are, they still look like they were kluged together with scrap material in my garage. Mass producing these was out of the question. There is just too much work involved in fabricating the parts, and more importantly, aligning everything so that the image was properly centered in the camera. And marketing these contraptions was out of the question. People could understand and appreciate concept, but wouldn't want the clumsy looking thing attached to their hunting rifle. I needed something more professional looking and 3D printing looked to be the most affordable option I had.
After a few weeks of research, I decided to buy an Airwolf3d v5.5 printer. I chose this one for the following features:
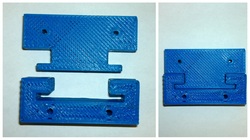
Instructions recommended printing a pre-packaged file that included a set of gears for the printer. Sorry, I was no longer that concerned with trashing a $1600 machine, I wanted to print something of my own. So I opened Google Sketchup, which I had begun learning to use while I was waiting for my printer to arrive, and drew a set of interlocking blocks shown here.
It is purely by luck that these things printed at all. I hadn't "sliced" the file, I simply opened it in the printer software and hit print. Since these were very small parts, 1" X 2" X 1/4", Pre-heating the extruder made it hot enough to melt the plastic for the entire print.
It took me a week and a half to figure out why I couldn't print anything bigger.
As functional as these prototypes are, they still look like they were kluged together with scrap material in my garage. Mass producing these was out of the question. There is just too much work involved in fabricating the parts, and more importantly, aligning everything so that the image was properly centered in the camera. And marketing these contraptions was out of the question. People could understand and appreciate concept, but wouldn't want the clumsy looking thing attached to their hunting rifle. I needed something more professional looking and 3D printing looked to be the most affordable option I had.
After a few weeks of research, I decided to buy an Airwolf3d v5.5 printer. I chose this one for the following features:
- It could be purchased fully assembled
- Fast print speed (100mm/sec)
- Low cost per part
- Printed a variety of material
Instructions recommended printing a pre-packaged file that included a set of gears for the printer. Sorry, I was no longer that concerned with trashing a $1600 machine, I wanted to print something of my own. So I opened Google Sketchup, which I had begun learning to use while I was waiting for my printer to arrive, and drew a set of interlocking blocks shown here.
It is purely by luck that these things printed at all. I hadn't "sliced" the file, I simply opened it in the printer software and hit print. Since these were very small parts, 1" X 2" X 1/4", Pre-heating the extruder made it hot enough to melt the plastic for the entire print.
It took me a week and a half to figure out why I couldn't print anything bigger.

 RSS Feed