 Nespresso dispensers #Abstract2Actual 22 hours
For those of you who don't know, Nespresso is a brand of espresso/coffee similar to Keurig, only better. It uses single serving containers known as "capsules" that come in a tall square sleeve. Nespresso makes all sorts of dispensers for the capsules, but they're expensive. I want to make a modular dispenser that you can mount to the wall or inside a cupboard door with a 3M command strip. The idea is to print as many or as few dispensers as varieties of coffee you keep on hand. You can also print them in different colors, to correspond to the capsule sleeves.
On Day 6 of A Doo-Dad A Day challenge, I attempted to create these dispensers. In the crunch for time, I failed to correctly calculate the geometry of the dispenser and although the dispenser didn't work, the effort wasn't a complete a bust. The validity of the concept was proven, I just needed to do a little tweaking to get it right. Here is the result of another hour or two of design work and printing.
On Day 6 of A Doo-Dad A Day challenge, I attempted to create these dispensers. In the crunch for time, I failed to correctly calculate the geometry of the dispenser and although the dispenser didn't work, the effort wasn't a complete a bust. The validity of the concept was proven, I just needed to do a little tweaking to get it right. Here is the result of another hour or two of design work and printing.
In order to prevent layer separation, I sliced these with .15mm layers, a relatively slow 50mm/sec perimeter speed, and set the extruder temp to 233C. I also added a 5mm brim for better adhesion to the bed. At these print settings, it takes about 3 hours to print a single dispenser. I printed them using both my Airwolf 3D v5.5 and my modified Prusa i3.
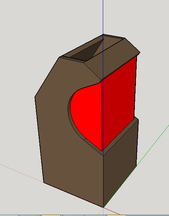
You can download the design file, thing741081 from Thingiverse.com. In the design, I included a single perimeter across the opening to act as support. This helps in 3 ways: it supports the overhanging dispenser lip to prevents it from sagging; it prevents warping of the upper curved surface during the print; and it prevents layer separation at the edges of the opening. This single perimeter support breaks away very easily and cleanly. I didn't have to do any finishing work like filing or sanding of the edges after removing the support. I could have allowed the Slic3r program to automatically generate the support, but I find that automatically generated support is too unpredictable and often difficult to clean up. It is worth the extra time to me to build support material into the design file.
You can download the design file, thing741081 from Thingiverse.com. In the design, I included a single perimeter across the opening to act as support. This helps in 3 ways: it supports the overhanging dispenser lip to prevents it from sagging; it prevents warping of the upper curved surface during the print; and it prevents layer separation at the edges of the opening. This single perimeter support breaks away very easily and cleanly. I didn't have to do any finishing work like filing or sanding of the edges after removing the support. I could have allowed the Slic3r program to automatically generate the support, but I find that automatically generated support is too unpredictable and often difficult to clean up. It is worth the extra time to me to build support material into the design file.
|
Left, the design file showing support material in red.
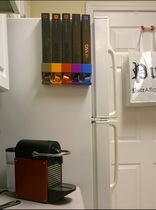
Right, dispensers in different colors mounted on the side of my refrigerator |
|


 RSS Feed