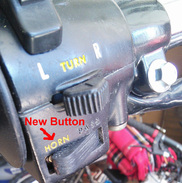
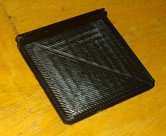
![]() While I was working with the Mauldin High School engineering students, one of the seniors, Stefan said that he and his dad were working on an old Kawasaki motorcycle. The button for the horn was broken and they couldn't find a replacement. Using an AutoDesk Cad program, I'm not sure which one, Stefan created a 3d model based on the broken button that they pulled off the bike. We sliced and printed it 3mm black ABS and he took it home, only to find that it didn't quite fit. We took the .stl file he had, and imported into GoogleSketchUp. We made three or four different versions of the button, each with minor dimension and shape differences. He took them home and this one worked perfectly. I'm not sure how long he worked on the original design file, but we spent about 30 minutes tweaking it and another 15 minutes printing them. #Abstract2Actual ca. 2:00
0 Comments
![]() One of the Senior engineering students at Mauldin High School wanted to showcase his design skills by creating a custom plaque that he could take with him off to college. I have no idea how long it took him to design, but It was very detailed, so I imagine he had a lot of hours in it. The print time on this plaque was four and a half hours. To make the lettering and emblem stand out, I switched out the filament on the fly when the print job got to the last flat layer of the plaque. It turned out really cool. We used 3mm orange ABS and 3mm white ABS for this project A couple of the senior engineering students at Mauldin High School are on the robotics team. Josh and Stefan (below left) have been really involved with the printer build there because they saw a lot of potential use for the printer in their robotics program. Using an Afinia 3d printer, they built the two axis servo mount (below right) using a design file downloaded from Thingiverse.com. they hooked the servos to an Arduino , added a joystick controller and a web cam. Now they can remotely operate the webcam to look in any direction. Since I split my time between Charlotte and Greenville, I decided I should have a printer in both locations. That way I could work on my patent development any time I wanted to. The experience building the Airwolf3d v5.5 with the school showed that I could definitely build a 3d printer. Rather than dropping another $1200 on a factory built machine, I decided to build my next machine completely from scratch. I picked the Prusa i3 design from www.reprap.org.
I'm writing this blog retroactively, so you'll be spared the minutia of the actual build. After looking at the design files I made a few changes. I scaled it up to allow me to install a 10" print bed and I raised the print height to 12". It took a while to find the right printed parts, and once I did, I found that there were lots of little things that I didn't like. I redesigned several of the parts, most notably, adding limit switch mounts for all 3 axis. I also designed and printed a mounting system for the electronics. I bought the geeetech electronics kit and bearings on Amazon, smooth and threaded rods from Fastenal, nuts, washers, and screws from Grainger. The kit from Amazon was only OK. The things I didn't like were that the heat sinks for the motor driver boards were not attached. I wound up frying about $110 worth of parts when one of the heat sinks slid off the driver board and shorted out. It didn't have a thermistor for the heabed. The limit switches were some kind of hybrid that I never figured out how to configure. It had an extra SD card reader which was unusable and unnecessary since the LCD controller had one built in. I don't know if the linear bearings were bad, or if the smooth rods were bad. Although they work, they don't move as smoothly as the ones on my Airwolf3d. The rods are scored, and the bearings tend to spin as they move down the shaft. I had a beast of time figuring out the cooling fan configuration. Initially I got them to turn on, but the X and Y drive motors started skipping. It turned out that I had the fan pins were not interchangeable. You MUST use pin 6 for the controller fan, and pin 11 for the extruder fan. If they are switched, they work, but it causes the machine to stutter. I also had to fish around to get the LCD controller to work, but it was simply a matter of un-commenting out the line for the appropriate controller. ![]() I was thrilled that I got my little test blocks to print. So I decided to try and print something a little bigger. It was just a 3 inch square block about a half inch thick with some beveled edges and screw holes. I tried to print it many times, but it would get about half way through the build and the extruder would jam up. I tried and tried and tried, but to no avail. I figured there might be something wrong with my file, so I decided to go with a "known good" source file. I broke down and printed the gear set that Airwolf3d suggested I print in the first place. Great news, the gear set printed, without a hitch! Bad news, I must be doing something wrong with my own design files. Back to the books I went and I learned lots of things. Different plastics melt at different temperatures. You can define this when you "slice" the file before printing it. There are about a hundred other parameters you can define when you slice the file. So what is slicing? That is the process of translating a three dimensional CAD file (usually in .stl format) into commands that the printer controller can understand. The file that the printer controller reads is called a gcode. Airwolf3d recommended I use an open source slicer program called Slic3r. Looking at all of the things you can control there was a bit overwhelming, but I eventually learned where to fine and set the basic parameters such as temperature, speed, and slice thickness. Airwolf3d also provided me with some prebuilt slicer configuration files that worked with my 5.5 printer. These configurations were the basis of my work, and I just tweaked them here and there as I learned how to use the features. ![]() It was two weeks of trial and error, mostly error, before I successfully printed anything. This first functional part was a mirror hanger. This is a 1.5" X 1.5" X 0.0625" square with a rounded top to act as a hinge. It was a very simple part, but the hard earned knowledge I acquired building it will take me a very long way. ![]() So I have this idea that I'm trying to patent and bring to market. It is a universal adapter that allows me to attach just about any smart phone to a rifle scope and record, through the scope, what I'm hunting. I've built several working models in my garage out of scraps of PVC pipe, MDF, craft mirrors, sheet metal, paperclips, screws and Elmer's glue. Resulting videos can be seen at www.crosshaircam.com As functional as these prototypes are, they still look like they were kluged together with scrap material in my garage. Mass producing these was out of the question. There is just too much work involved in fabricating the parts, and more importantly, aligning everything so that the image was properly centered in the camera. And marketing these contraptions was out of the question. People could understand and appreciate concept, but wouldn't want the clumsy looking thing attached to their hunting rifle. I needed something more professional looking and 3D printing looked to be the most affordable option I had. After a few weeks of research, I decided to buy an Airwolf3d v5.5 printer. I chose this one for the following features:
Instructions recommended printing a pre-packaged file that included a set of gears for the printer. Sorry, I was no longer that concerned with trashing a $1600 machine, I wanted to print something of my own. So I opened Google Sketchup, which I had begun learning to use while I was waiting for my printer to arrive, and drew a set of interlocking blocks shown here. It is purely by luck that these things printed at all. I hadn't "sliced" the file, I simply opened it in the printer software and hit print. Since these were very small parts, 1" X 2" X 1/4", Pre-heating the extruder made it hot enough to melt the plastic for the entire print. It took me a week and a half to figure out why I couldn't print anything bigger. |
TJ EmsleyLifetime tinkerer. Archives
October 2022
Categories
All
|